Ultimate WordPress Speed Optimization: 2026 Complete Technical Guide
Your WordPress site is slow. You know it, your visitors know it, and worst of all, Google knows it. Every second of delay costs you conversions, rankings, and revenue. The good news? Most performance issues come from the same handful of problems, and fixing them doesn’t require a computer science degree.
This guide covers everything you need to transform a sluggish WordPress site into a speed demon. We’re talking sub-2-second load times and 90+ PageSpeed scores. No fluff, no generic advice you’ve read a hundred times. Just actionable techniques that actually work.
Let’s fix your site.
Understanding Why WordPress Gets Slow
Before throwing plugins at the problem, you need to understand what’s actually slowing things down. WordPress itself is pretty efficient. The slowness comes from what we pile on top of it.
The usual suspects:
- Unoptimized images eating up bandwidth (often 50-70% of total page weight)
- Too many plugins making database queries and loading scripts
- No caching forcing WordPress to rebuild pages from scratch every time
- Bloated themes with features you’ll never use
- Database clutter from years of revisions, spam, and abandoned plugin data
- Render-blocking resources making browsers wait before displaying content
The key insight here is that speed optimization isn’t one thing. It’s layers. Each layer you optimize compounds the gains from the others. A site with great caching but terrible images will still be slow. A site with optimized images but no caching will still be slow.
You need to address all the layers.
Measuring Your Current Performance
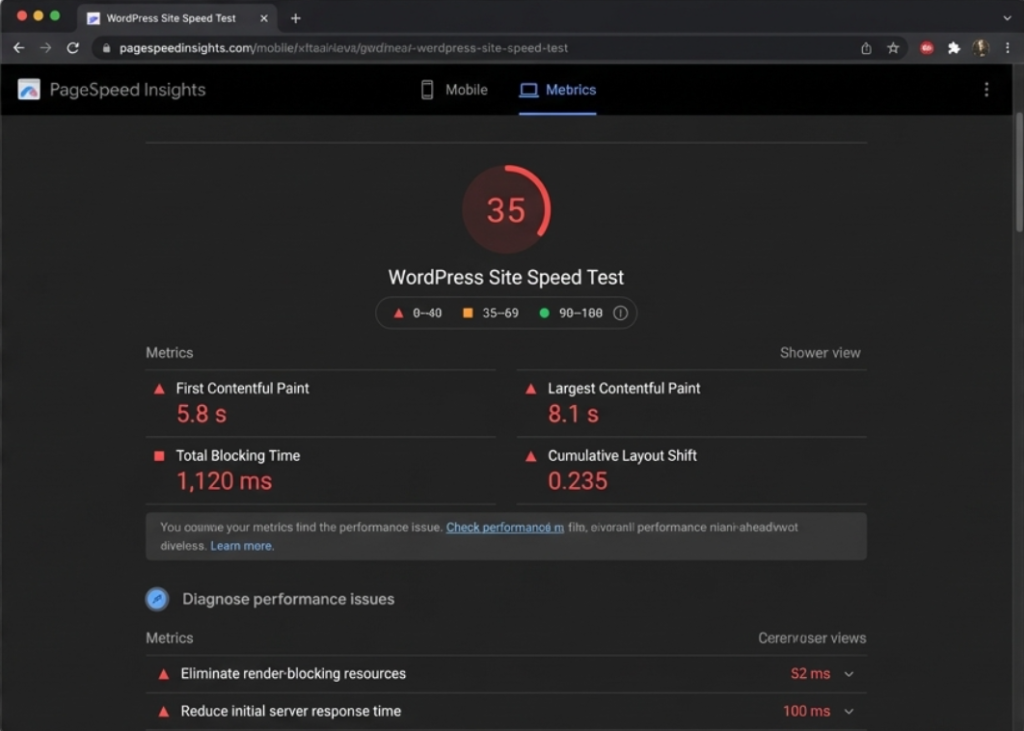
You can’t improve what you don’t measure. Before changing anything, benchmark your current performance so you can track progress.
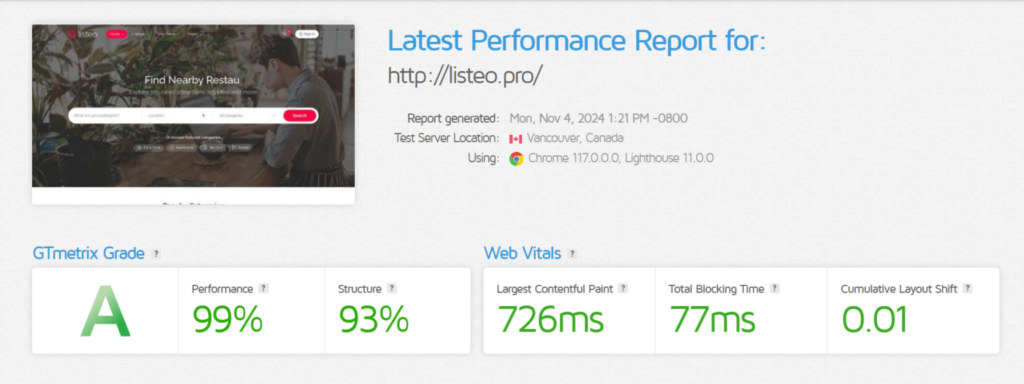
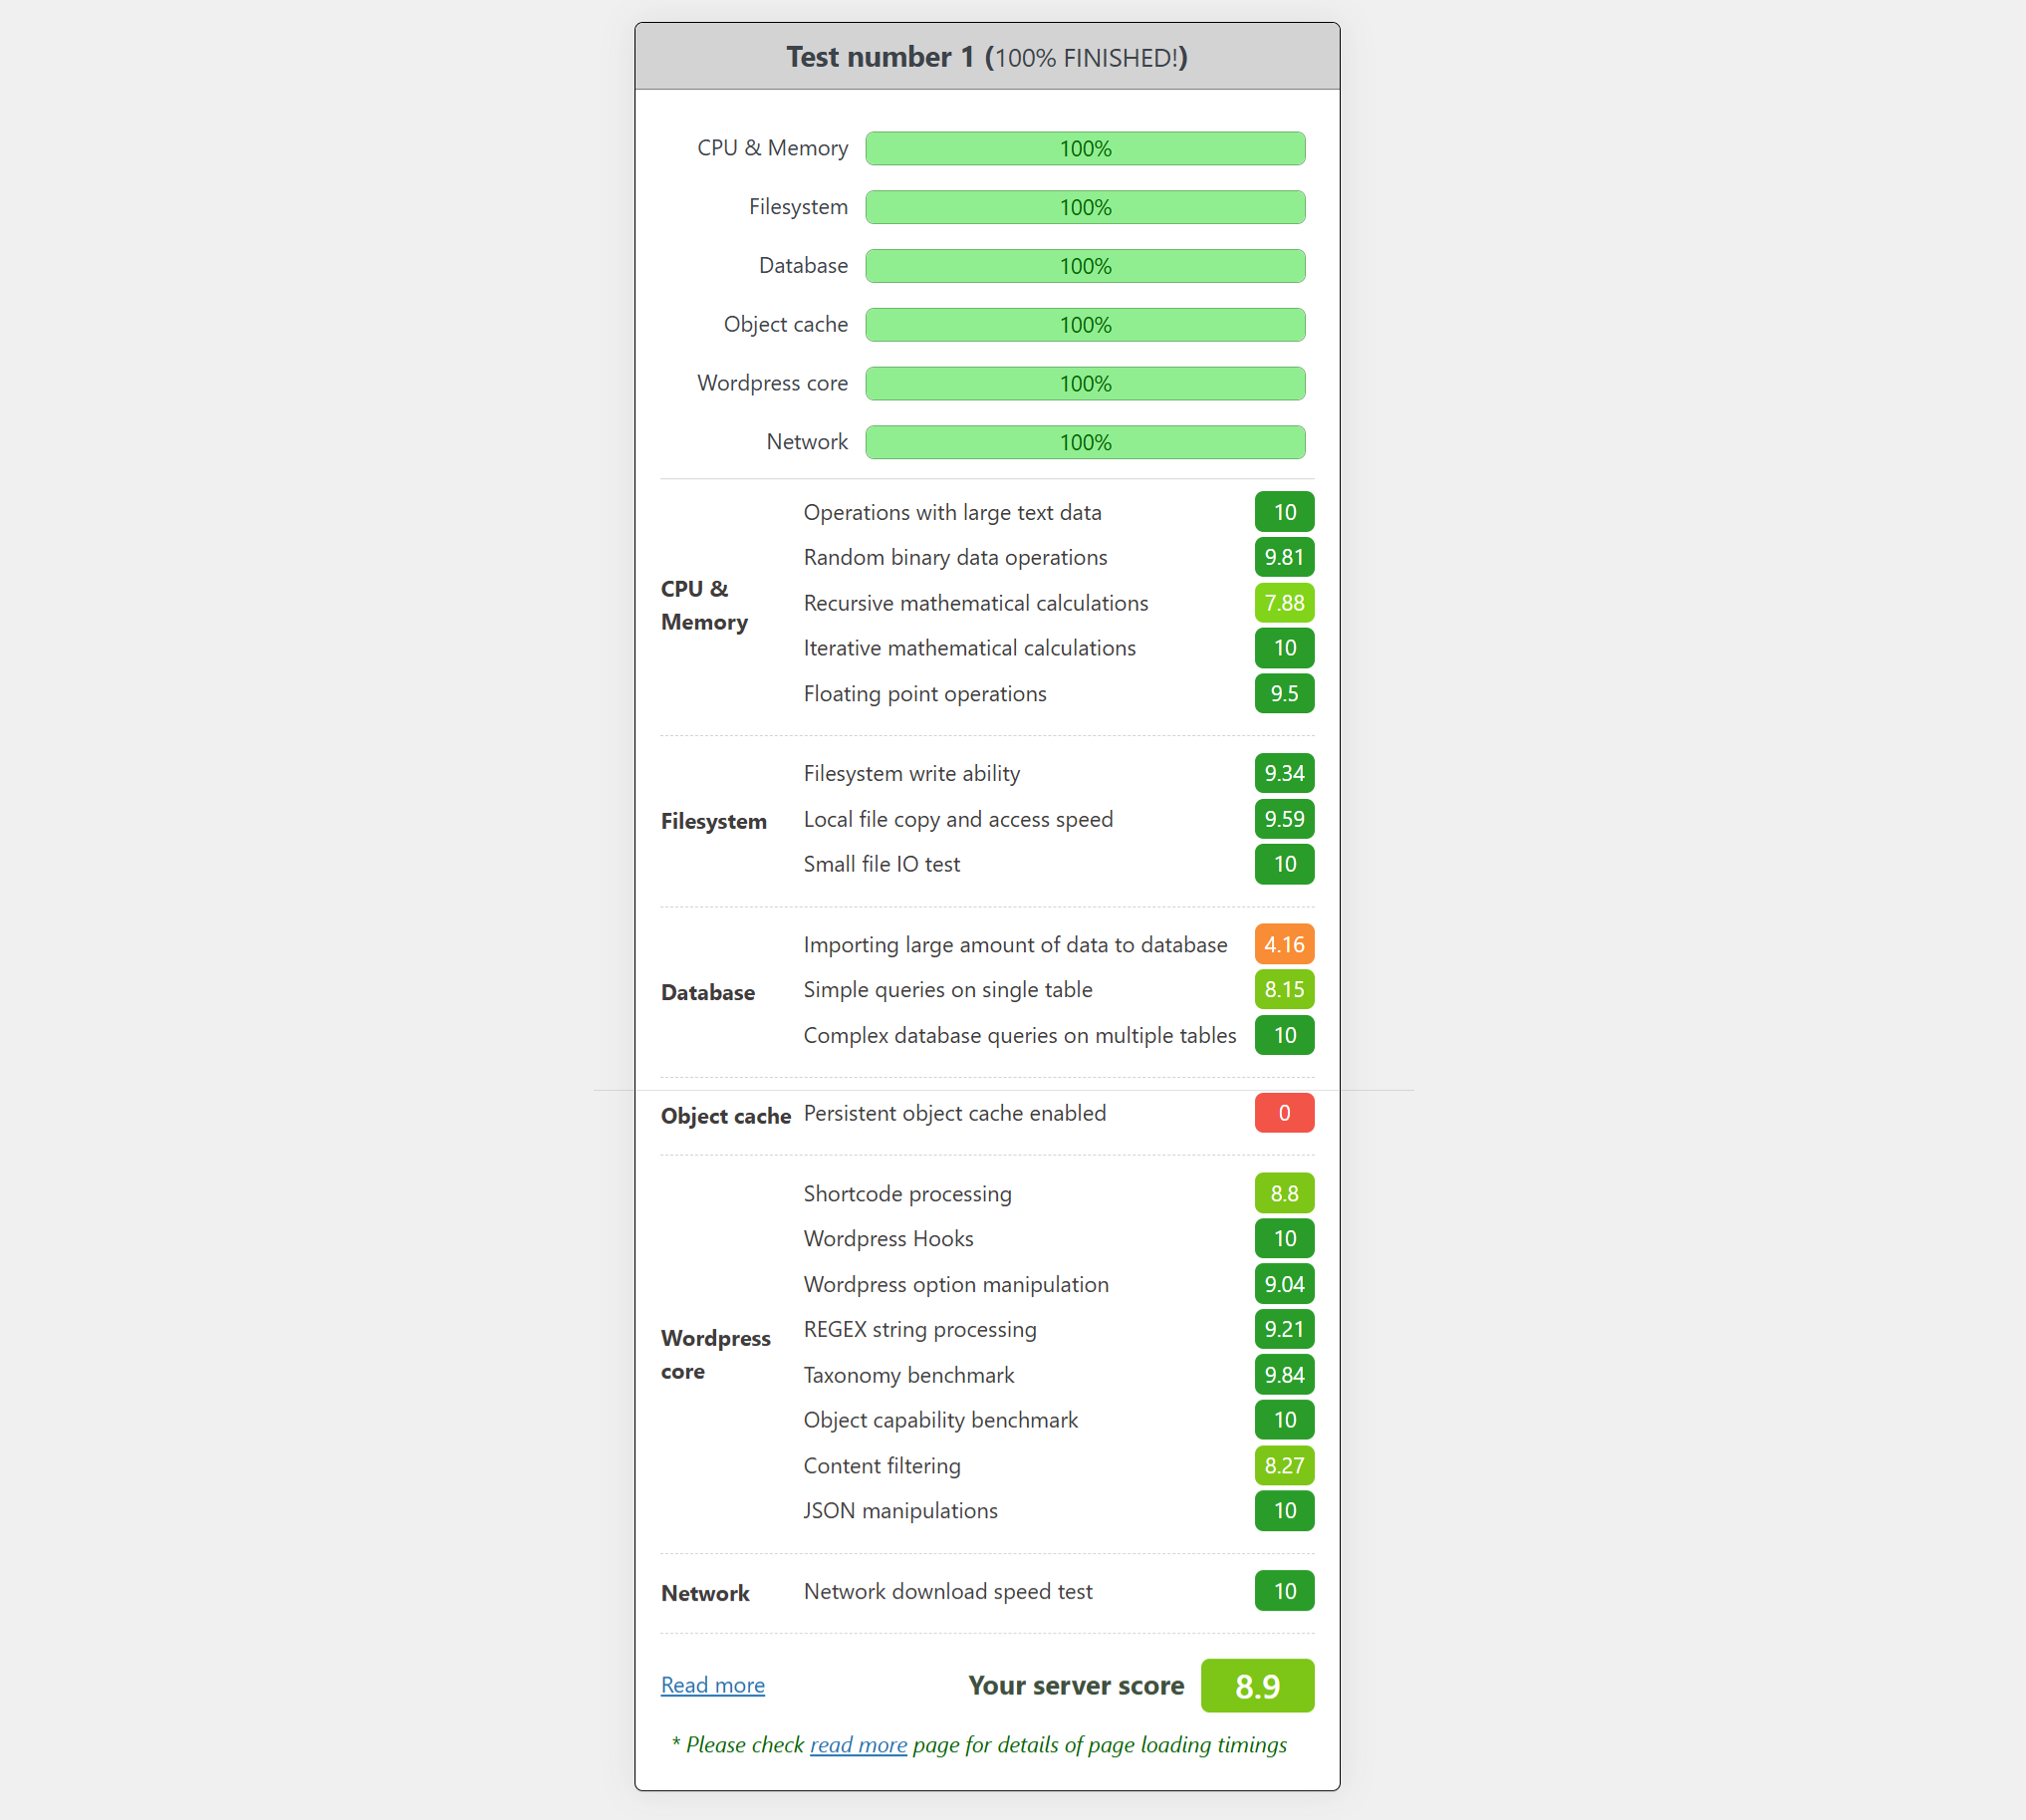
As you can see, as a theme authors we care about optimizing our products. Below results for our Listeo theme:
The Testing Tools You Actually Need
- Google PageSpeed Insights (pagespeed.web.dev) gives you the metrics Google actually uses for rankings. The “field data” section shows real user experience, while “lab data” shows controlled test results. Both matter.
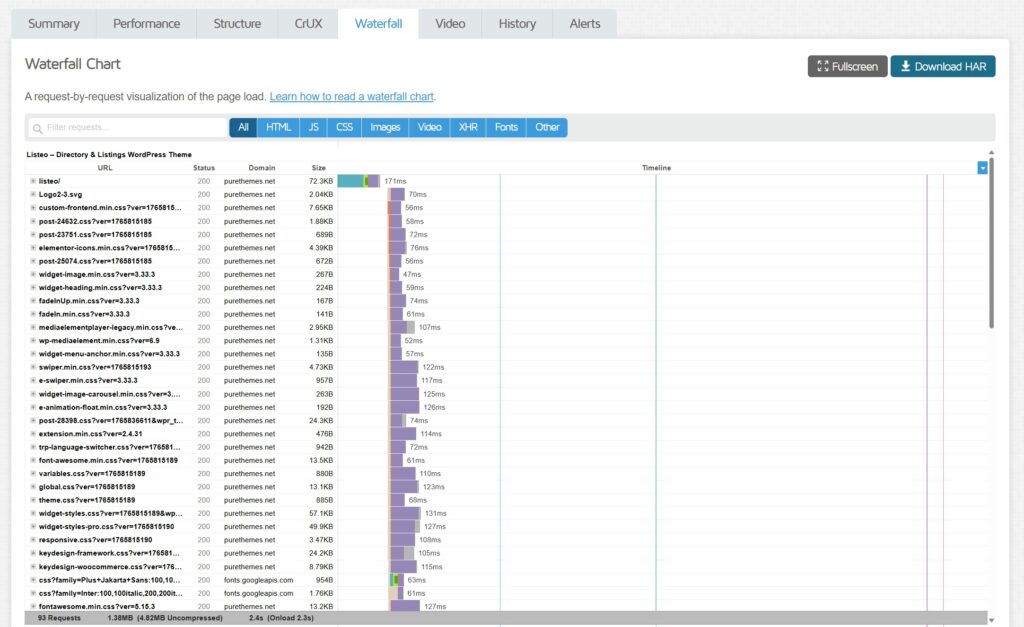
- GTmetrix (gtmetrix.com) provides detailed waterfall charts showing exactly what’s loading and when. The free tier is enough for most diagnostics.
- WebPageTest (webpagetest.org) offers advanced testing from multiple locations with filmstrip views showing how your page renders frame by frame.
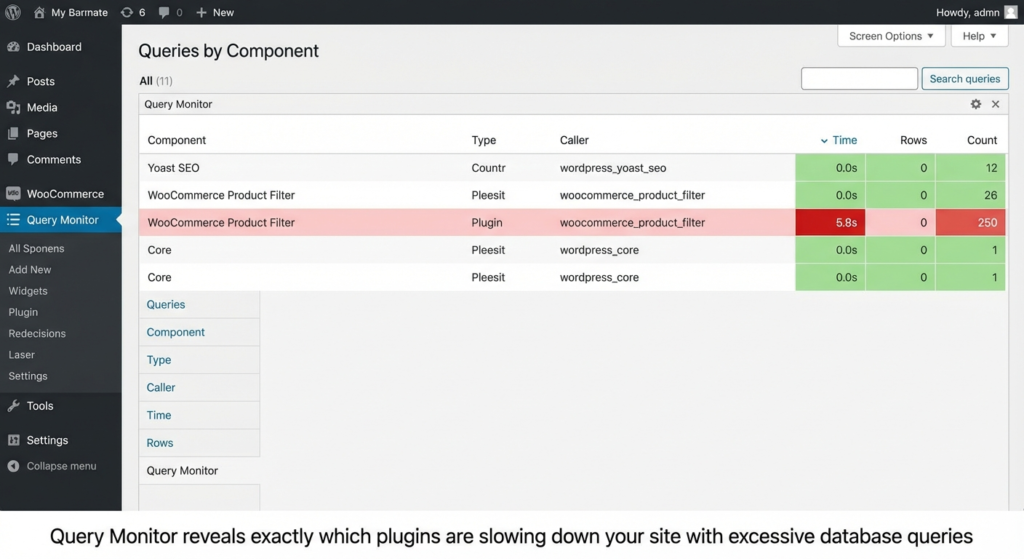
- Query Monitor is a WordPress plugin for backend debugging. It shows you which plugins are running slow database queries, how many queries each page makes, and which scripts are loading where.
- Hosting Benchmark Tool – This plugin empowers you to thoroughly evaluate your WordPress hosting server’s performance with detailed, objective metrics
How to Test Properly
Run at least 3 tests per page and use the median result. Networks vary, servers have good and bad moments, and single tests can be misleading.
Test from locations where your users actually are. If your audience is in Germany, testing from Virginia doesn’t tell you much.
Always test mobile performance first. Google uses mobile-first indexing, and mobile scores are almost always worse than desktop. If your mobile score is good, desktop will take care of itself.
Clear all caches between tests when making changes. This includes WordPress cache, CDN cache, and browser cache. Otherwise you’re testing old versions.
Test Your Hosting First (This Is Critical)
Here’s a truth most optimization guides skip: no amount of caching, image compression, or code tweaking can fix slow hosting. If your server takes 2 seconds just to respond, you’re fighting with one hand tied behind your back.
Before spending hours on optimizations, benchmark your hosting. You need to know if your performance ceiling is limited by the server itself.
Plugin for testing hosting performance: https://wordpress.org/plugins/wpbenchmark/
Why Hosting Performance Matters More Than You Think
Every page request starts with your server. The browser asks for a page, and your server needs to:
- Receive the request
- Execute PHP
- Query the database
- Build the response
- Send it back
This happens before any frontend optimization kicks in. A server that takes 800ms to do this work means your page can never load faster than 800ms, period. Meanwhile, quality hosting completes this in under 200ms.
The difference between cheap shared hosting and proper WordPress hosting can be 500-1500ms on every single page load. That’s not something you can optimize away with plugins.
How to Benchmark Your Hosting
Use a Hosting Benchmark Tool to measure your server’s actual performance across multiple components. Unlike simple speed tests, a proper benchmark tool stress-tests the specific things WordPress depends on:
- CPU & Memory – Tests how fast your server processes data. This affects PHP execution speed, which directly impacts how quickly WordPress builds pages. The tool runs operations with large text data and random binary data to measure raw processing power.
- Filesystem – Tests read/write speeds on your server’s disk. WordPress constantly reads theme files, plugin files, and writes cache files. Slow filesystem = slow everything. Sub-tests include write ability, file copy speed, and small file IO operations.
- Database – This is huge for WordPress. The tool tests importing large amounts of data, simple queries on single tables, and complex queries across multiple tables. If your database tests score low, every page load suffers.
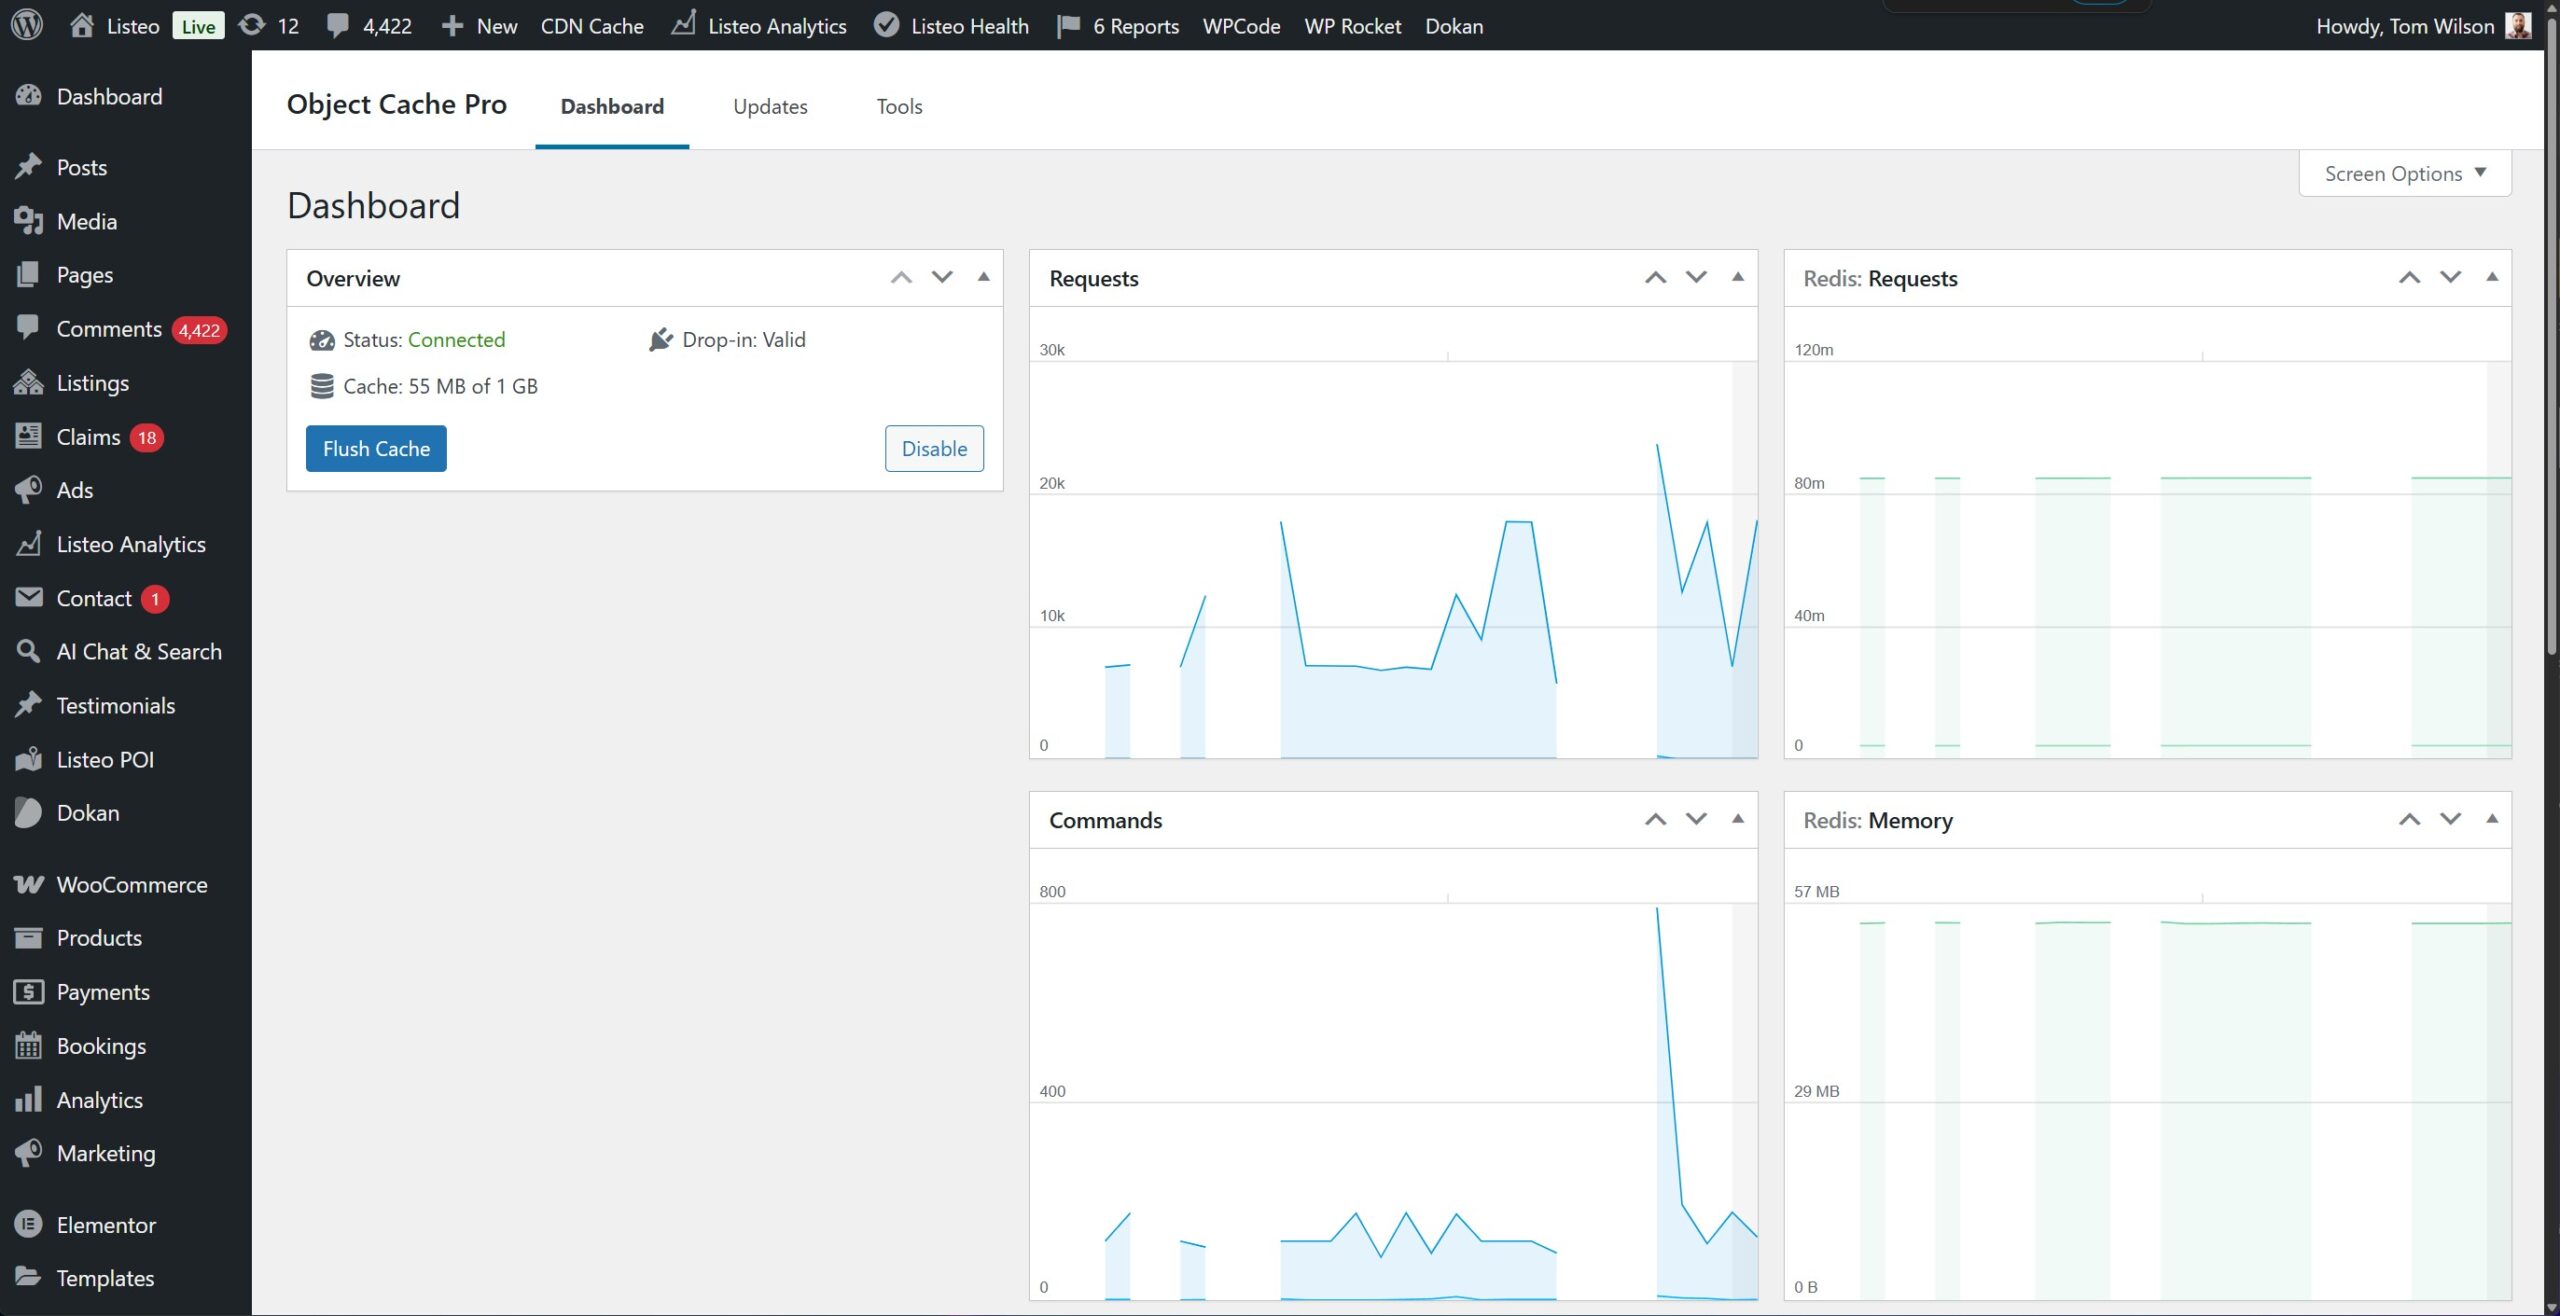
- Object Cache – Tests whether persistent object caching (Redis/Memcached) is enabled and how fast it performs. Sub-tests measure cache write speed, read speed, and mixed read/write operations. If object cache shows as disabled or slow, you’re missing a major optimization opportunity.
- Network – Tests download speed from your server. This affects how fast your server can fetch external resources and how quickly it can send data to visitors.
Understanding Your Benchmark Scores
The tool gives you both category percentages (how many tests passed) and individual test scores on a scale up to 10. Your overall server score combines everything into a single number.
Score interpretation:
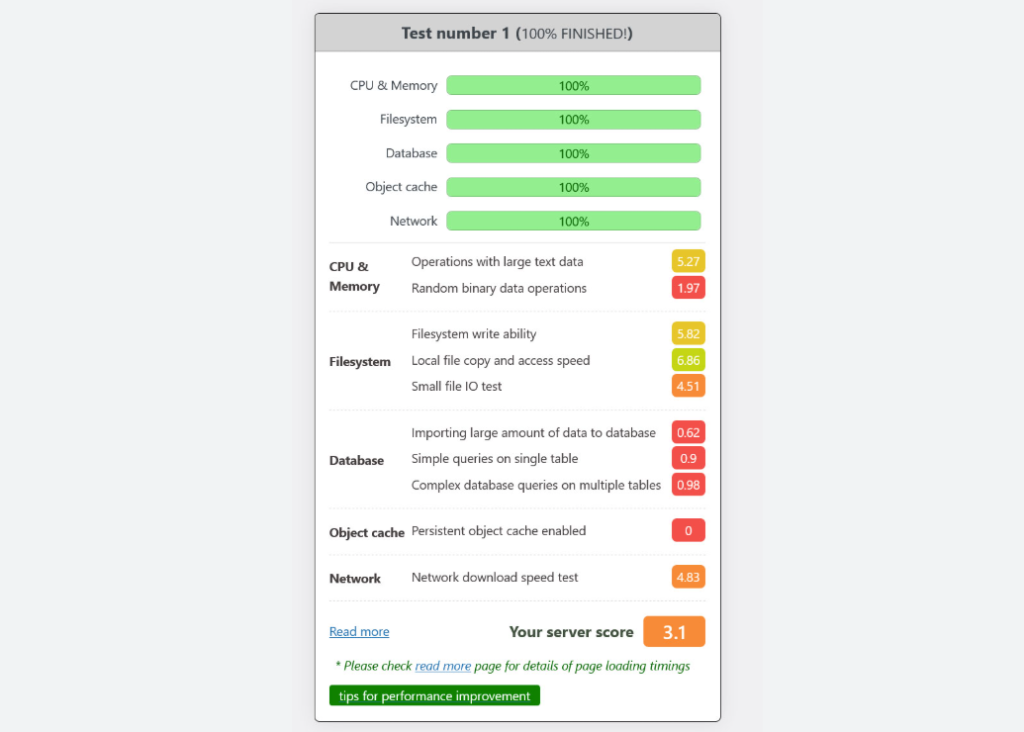
- 8-10: Excellent. Your hosting is solid.
- 7-8: Good. Room for improvement but workable.
- 6-7: Mediocre. Your hosting is holding you back.
- Below 6: Poor. Seriously consider switching hosts.
Pay special attention to these results:
Database scores matter most for WordPress. If “Complex database queries on multiple tables” scores below 5, your site will struggle with anything beyond basic blogs. WooCommerce stores, membership sites, and busy blogs need strong database performance.
Object cache status is critical. If “Persistent object cache enabled” shows a low score or isn’t available, you’re missing one of the biggest performance wins. Many budget hosts don’t offer Redis or Memcached at all.
Filesystem scores affect caching. Page caching plugins write thousands of small files. If “Small file IO test” scores poorly, your cache will be slow to generate and serve.
What Your Results Mean
Server score 7+: Your hosting is solid. Proceed with the optimizations in this guide and you’ll see great results.
Server score 6: Your hosting is adequate but has weak spots. Check which categories scored lowest. If it’s database or object cache, those specific optimizations will have limited impact until you upgrade hosting.
Server score below 6: Your hosting is the problem. No amount of plugin tweaking will overcome fundamentally slow infrastructure. You need to either:
- Upgrade your hosting plan (shared → managed WordPress)
- Switch to a WordPress-optimized host
- Move to a VPS with proper configuration
Quick Server Checks You Can Do Right Now
- Check PHP version (Dashboard → Tools → Site Health → Info → Server). Running PHP 8.3+ is essential. PHP 7.4 is significantly slower and reached end-of-life.
- Check available memory. If your host limits you to 64MB or 128MB PHP memory, complex pages will struggle.
- Check server location. If your server is in the US but your audience is in Europe, every request travels across the Atlantic. A CDN helps, but closer hosting is better.
When to Switch Hosting
Consider switching if:
- Benchmark shows consistent TTFB over 500ms
- Performance varies wildly between tests (unstable neighbors on shared hosting)
- Your host doesn’t offer PHP 8.x
- Redis/Memcached object caching isn’t available
- Support can’t explain why your site is slow
The cost difference between budget hosting ($5/month) and quality WordPress hosting provider like Kinsta ($25-50/month) is trivial compared to the performance gains. Don’t build a speed-optimized site on a slow foundation.
Caching: The Single Biggest Performance Win
If you do nothing else from this guide, set up proper caching. It’s the single most impactful optimization you can make.
Here’s why: Without caching, every visitor request triggers WordPress to execute PHP code, query the database, assemble the page, and send it back. That process takes hundreds of milliseconds at minimum, often much longer.
With page caching, WordPress builds the page once, saves it as static HTML, and serves that pre-built file to everyone. The server just reads and sends a file. We’re talking single-digit milliseconds.
Page Caching Plugins Worth Using
- WP Rocket ($59/year) is the gold standard. It applies 80% of optimizations automatically on activation and has the best user experience. If budget allows, this is what I recommend. Check our recommended settings for WP Rocket
- LiteSpeed Cache (free) is the best free option if your host runs LiteSpeed servers. It includes features that other free plugins charge for.
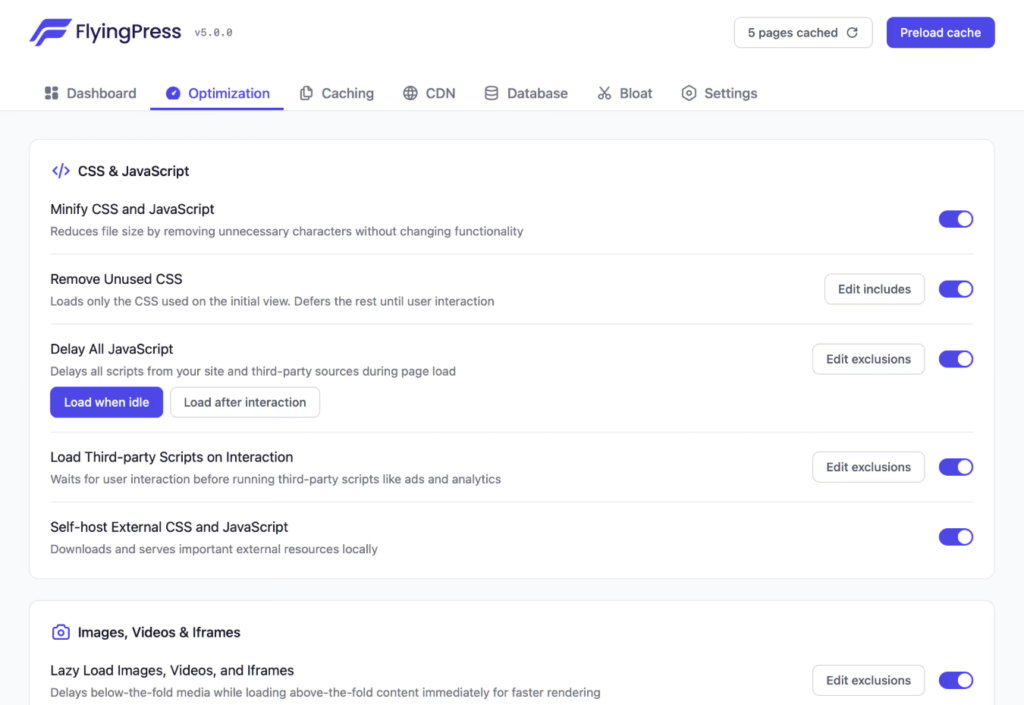
- FlyingPress ($60/year) is a newer alternative with excellent Core Web Vitals optimization. Worth considering if you want something modern.
- WP Super Cache (free) is Automattic’s official caching plugin. Lightweight and reliable, though less feature-rich.
- W3 Total Cache (free) is powerful but complex. The configuration options can overwhelm beginners, but it’s capable in the right hands.
Critical Caching Settings
Enable cache preloading. This generates cached pages in the background before visitors arrive, so no one ever hits an uncached page.
Create separate mobile cache only if you’re serving different content to mobile users. If your site is responsive (same HTML, different CSS), you don’t need this. It just doubles your cache storage.
Exclude dynamic pages from caching. This includes:
/cart/*/checkout/*/my-account/*- Any page with user-specific content
Set appropriate cache expiration. For most sites, 24 hours works well. News sites might want shorter, static sites can go longer.
Enable Object Caching with Redis, Memcached, or Docket
Page caching handles frontend requests. Object caching handles the backend by storing database query results in memory.
Think of it this way: Even with page caching, logged-in users, admin pages, and dynamic content still hit the database constantly. Object caching means WordPress checks memory first (microseconds) before hitting MySQL (milliseconds).
Here’s the catch: You can’t just enable Redis or Memcached yourself. Your hosting provider must support it at the server level. Check your hosting control panel or contact support to see if object caching is available on your plan. Many shared hosts don’t offer it, while managed WordPress hosts and VPS providers typically do.
Once you’ve confirmed your host supports it:
- For LiteSpeed servers: LiteSpeed Cache plugin includes built-in object caching
- For Redis: Install the Redis Object Cache plugin
- For Memcached: Use the W3 Total Cache or similar plugin with Memcached support
No Redis or Memcached available? Try Docket Cache. It’s a file-based object cache that works on any hosting without server-level requirements. It won’t match Redis performance, but it’s significantly better than no object caching at all and requires zero server configuration.

Image Optimization: Cutting Page Weight in Half
Images are usually the heaviest elements on any page. A single unoptimized hero image can outweigh all your HTML, CSS, and JavaScript combined.
The goal is smaller file sizes without visible quality loss. Modern compression is remarkably good at this.
Compression: Lossy vs Lossless
Lossy compression removes some image data permanently. At quality levels of 60-90%, the visual difference is imperceptible to humans, but file sizes drop by 40-70%.
Lossless compression keeps all image data but optimizes how it’s stored. Smaller gains (10-30%) but no quality loss whatsoever.
For photos and most web images, lossy compression at 80-85% quality hits the sweet spot.
Image Optimization Plugins
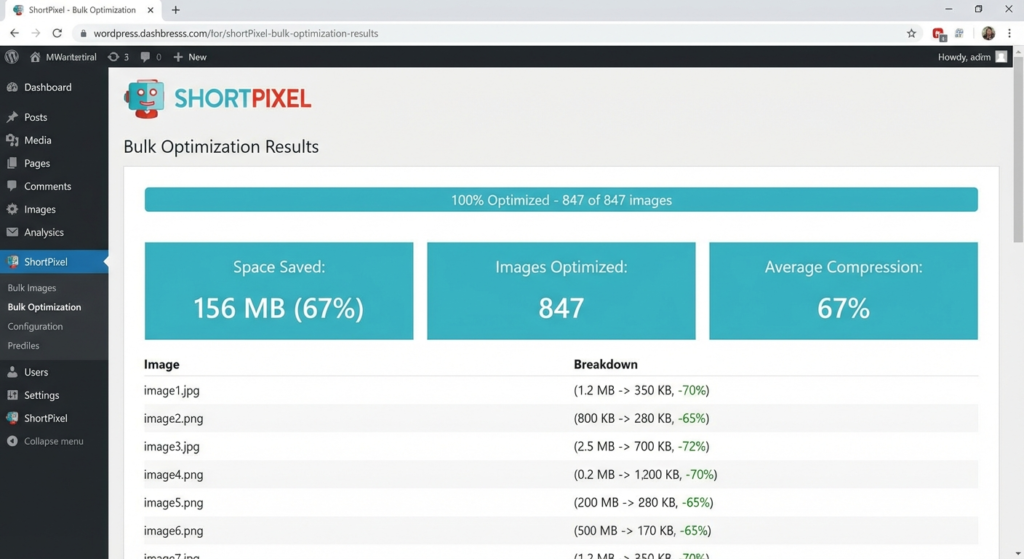
- ShortPixel ($4.99/month for 5,000 images) excels at PNG compression and offers the best overall quality. Includes free CDN.
- Imagify ($4.99/month for 10,000 images) works seamlessly with WP Rocket and produces excellent JPG results.
- EWWW Image Optimizer offers free local optimization (slower, uses your server resources) or cheap cloud processing ($0.003/image).
- Optimole takes a different approach with on-the-fly optimization and built-in CDN. Free for sites under 5,000 visitors/month.
All of these can automatically optimize images on upload and bulk optimize existing images. Run bulk optimization during low-traffic hours since it’s resource-intensive.
Lazy Loading Done Right
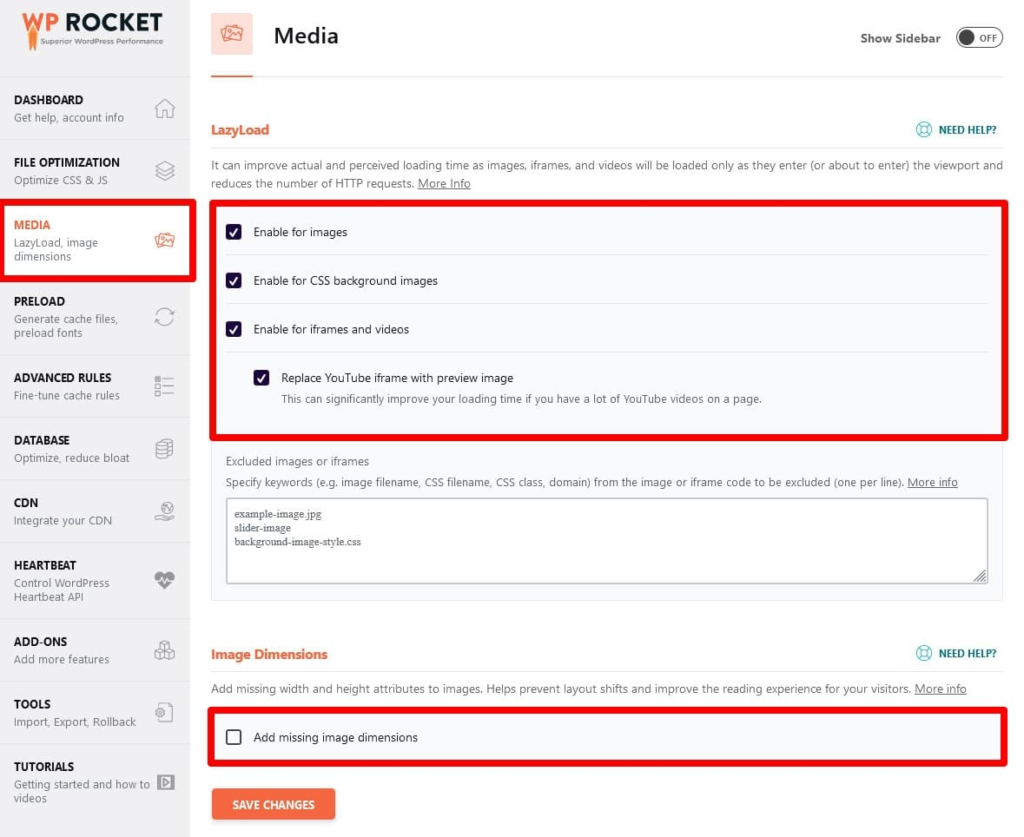
Lazy loading defers image downloads until users scroll near them. This saves bandwidth and speeds up initial page load, but there’s a catch: lazy loading your hero image kills your LCP score. The Largest Contentful Paint element needs to load immediately, not wait for scrolling.
Good optimization plugins handle this automatically.
- WP Rocket detects above-the-fold images and excludes them from lazy loading. You can also manually exclude specific images by CSS class or filename in Settings → WP Rocket → Media.
- Perfmatters lets you exclude images by URL, class, or set a number of images to skip (e.g., “skip first 3 images”).
- FlyingPress has automatic LCP image detection. It identifies your LCP element and excludes it from lazy loading without any configuration.
- LiteSpeed Cache includes an “Exclude LCP Image” option that does exactly what it says.
If your LCP image is still lazy loaded (PageSpeed Insights will warn you about this), look for an “Exclude from lazy load” option in your caching plugin and add your hero image’s filename or CSS class.
Database Optimization: Cleaning Years of Clutter
WordPress databases accumulate junk over time. Post revisions pile up, plugins leave behind abandoned data, and transients expire without getting cleaned. This bloat slows queries and wastes storage.
Use a Database Cleanup Plugin
Don’t mess with SQL queries manually when plugins handle this safely and automatically.
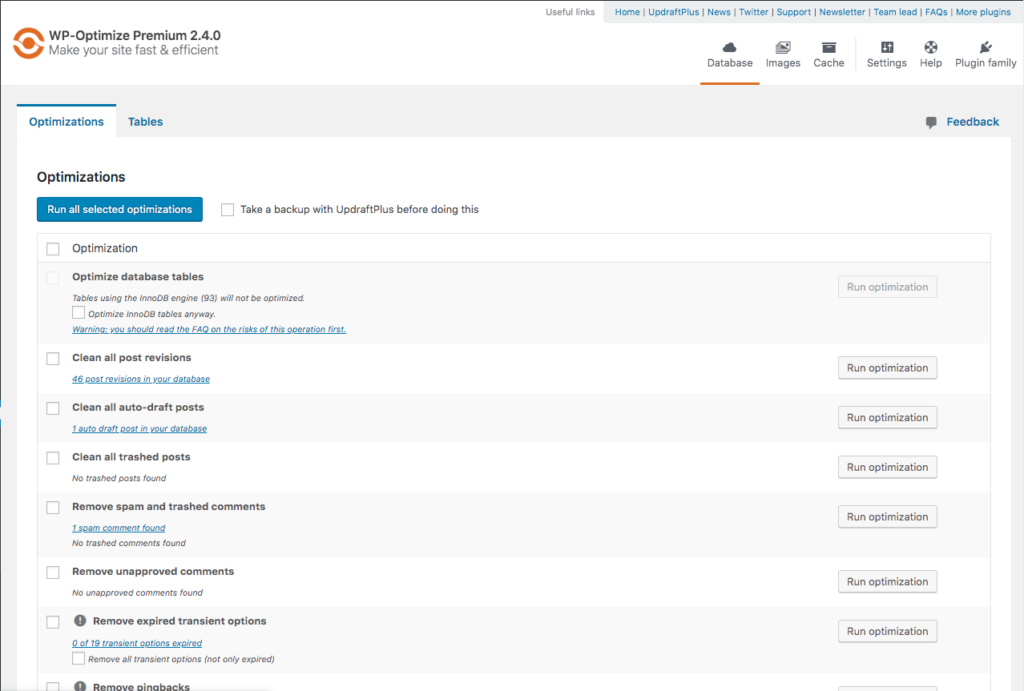
WP-Optimize (free) is the most popular option. It cleans:
- Post revisions
- Auto-drafts
- Trashed posts
- Spam and trashed comments
- Expired transients
- Orphaned postmeta
You can run cleanups manually or schedule them weekly/monthly. It also optimizes database tables with one click.
WP-Sweep (free) is a lighter alternative that focuses purely on cleanup without extra features. Good if you want something minimal.
Advanced Database Cleaner (free with pro version) offers the most granular control. It detects orphaned tables from deleted plugins and lets you see exactly what’s being removed before deleting.
Recommended Cleanup Schedule
Set your plugin to run automatically:
- Weekly: Clear spam comments, expired transients, trashed items
- Monthly: Remove old revisions, optimize tables
Limit Revisions Going Forward
WordPress saves unlimited revisions by default. Cleaning them up is good, but preventing the buildup is better.
Perfmatters has a “Limit Post Revisions” setting where you can set a number (5 is reasonable) or disable them entirely.
If you prefer not to use a plugin for this, add to wp-config.php:
define('WP_POST_REVISIONS', 5);Checking Autoloaded Data (Advanced)
This is one case where a manual check is worthwhile. Autoloaded options load on every single page request, and bloated autoload data is a hidden performance killer.
Run this in phpMyAdmin or your database tool:
sql
SELECT SUM(LENGTH(option_value)) / 1024 / 1024 AS autoload_mb
FROM wp_options
WHERE autoload='yes';
Healthy: under 800KB. Problematic: over 1MB. Critical: over 2MB.
Find the culprits:
sql
SELECT option_name, LENGTH(option_value) / 1024 AS size_kb
FROM wp_options
WHERE autoload='yes'
ORDER BY LENGTH(option_value) DESC
LIMIT 20;
Common offenders include old redirect rules, abandoned plugin settings, and bloated theme options. Advanced Database Cleaner Pro can identify and fix autoload issues through its interface if you’d rather not touch SQL.
Disabling Unnecessary WordPress Features
WordPress loads several features by default that many sites don’t need. Each one adds JavaScript, CSS, or processing overhead.
The Easy Way: Use Perfmatters
Perfmatters ($24.95/year) is purpose-built for this. One plugin, simple toggles, done.
Script Manager tab:
- Disable emojis
- Disable embeds (oEmbed)
- Disable XML-RPC
- Disable RSS feeds
- Disable REST API links
- Remove jQuery Migrate
- Remove dashicons for logged-out users
Extras tab:
- Heartbeat control (disable, or reduce frequency)
- Limit post revisions
- Disable self-pingbacks
- Remove shortlink
- Remove RSD link
- Disable Google Maps API
- Disable password strength meter

You check boxes, save, done. No code, no functions.php, no risk of breaking things.
Alternative: Check Your Caching Plugin First
Before buying another plugin, check what your caching plugin already offers:
WP Rocket (Settings → Media → Embeds) lets you disable embeds.
LiteSpeed Cache (Page Optimization → Tuning) has options for removing query strings, Google Fonts optimization, and heartbeat control.
FlyingPress includes options to disable emojis, remove unused CSS, and delay JavaScript.
You might already have these features and not know it.
Free Alternative: Code Snippets
If you don’t want to buy Perfmatters and your caching plugin doesn’t cover what you need, use the free Code Snippets plugin to add small PHP functions without touching your theme files.
Disable Heartbeat (or slow it down):
php
add_filter('heartbeat_settings', function($settings) {
    $settings['interval'] = 60; // Slow to 60 seconds instead of 15
    return $settings;
});
Disable Emojis:
php
remove_action('wp_head', 'print_emoji_detection_script', 7);
remove_action('wp_print_styles', 'print_emoji_styles');
Disable XML-RPC (via .htaccess is more secure):
apache
<Files xmlrpc.php>
    Order Deny,Allow
    Deny from all
</Files>
But honestly, Perfmatters at $25/year is worth it just for the convenience and knowing it’s done correctly.
Plugin Audit: Finding the Performance Killers
Plugins are the biggest wild card in WordPress performance. One poorly-coded plugin can add hundreds of milliseconds to every page load.
Identifying Slow Plugins with Query Monitor
Query Monitor (free) is essential for diagnosing plugin performance issues. Install it temporarily, browse your site, and check:
Queries by Component: Shows database queries per plugin. Look for plugins making 50+ queries or individual queries taking over 0.01 seconds.
Scripts and Styles: Shows which plugins load JavaScript and CSS, and on which pages. This reveals plugins loading assets site-wide when they’re only needed on specific pages.
Common Performance-Heavy Plugin Categories
Some plugin types are notorious for performance issues:
- Page builders (Elementor, Divi, WPBakery) add significant overhead. They’re convenient but come at a cost.
- Social sharing plugins often load scripts from multiple third-party services.
- Statistics plugins that track everything hammer the database with writes.
- Sliders and carousels load heavy JavaScript libraries.
- “All-in-one” plugins try to do everything, loading components you might not need.
This doesn’t mean you can’t use these plugins. Just be aware of the tradeoffs.
Conditional Plugin Loading
Many plugins load their CSS and JavaScript on every page, even when not needed. Contact Form 7 loading on your homepage. WooCommerce scripts on blog posts. Gallery lightboxes on pages without galleries.
Asset CleanUp (free) scans each page and shows you every CSS/JS file loaded. You can disable specific files per page, post type, or site-wide.
Perfmatters Script Manager does the same thing with a cleaner interface. You can see all scripts and stylesheets, and disable them with toggles.
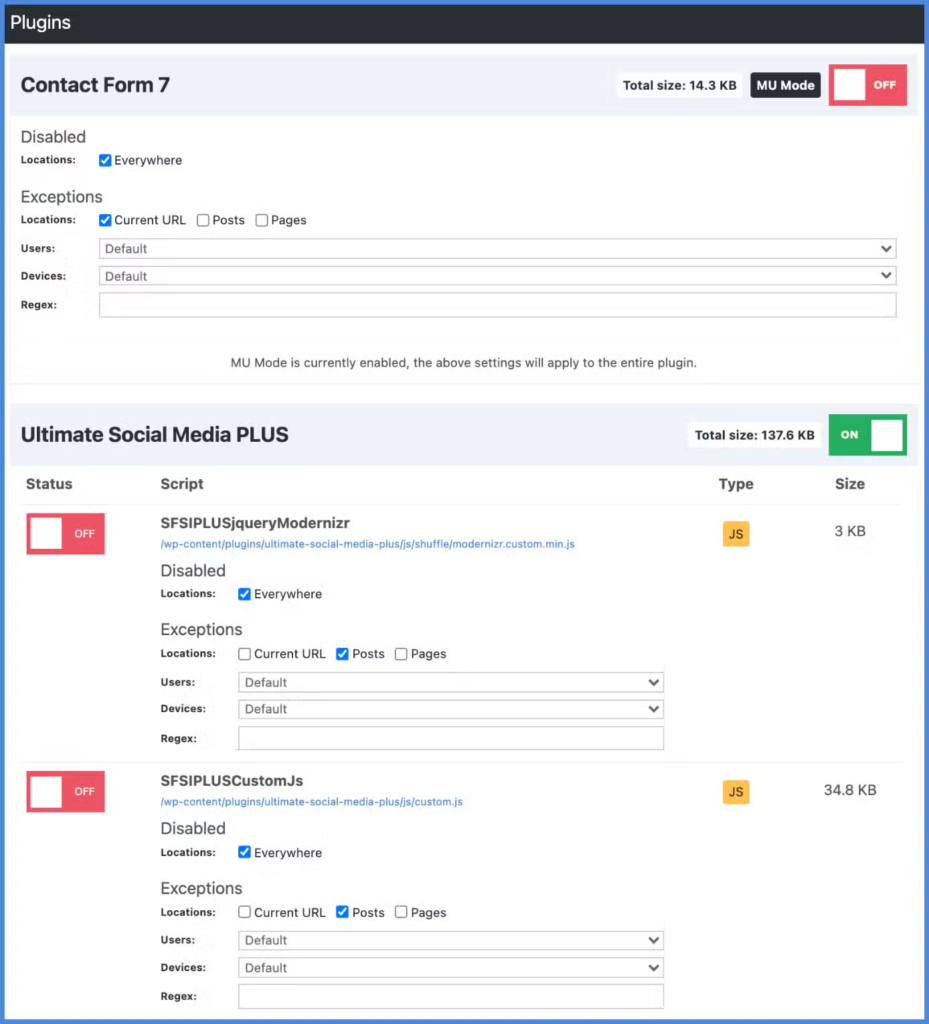
Example savings:
- Disable Contact Form 7 everywhere except your Contact page
- Disable WooCommerce scripts on non-shop pages
- Disable slider scripts on pages without sliders
- Disable comment scripts on pages with comments disabled
This alone can eliminate 10-20 HTTP requests per page on bloated sites.
JavaScript Optimization
Render-blocking JavaScript is one of the most common performance issues. The fix is deferring or delaying scripts so they don’t block page rendering.
Your caching plugin handles this. Look for these settings:
- WP Rocket: File Optimization → JavaScript Files → “Load JavaScript deferred” and “Delay JavaScript execution”
- FlyingPress: JavaScript → “Defer JavaScript” and “Delay JavaScript”
- LiteSpeed Cache: Page Optimization → JS Settings → “Load JS Deferred”
- Perfmatters: Assets → “Defer JavaScript” and “Delay JavaScript”
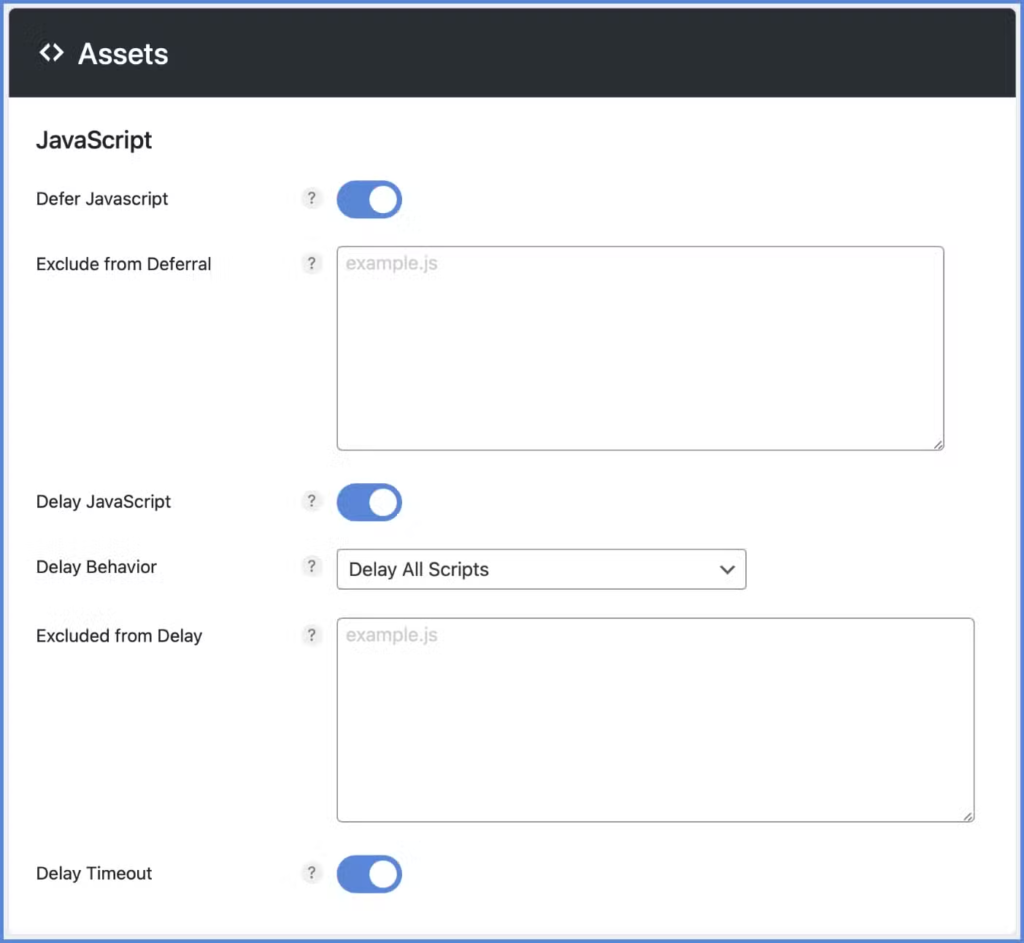
Delay JavaScript is particularly powerful. It prevents scripts from running until user interaction (mouse movement, scroll, or click). Analytics, chat widgets, and social scripts don’t need to run until someone actually interacts with the page.
If you have issues after enabling defer: Some themes and plugins have poorly-coded JavaScript that breaks when deferred. Your plugin will have an exclusion field where you can list specific scripts to keep loading normally. jQuery is the most common one that needs excluding.
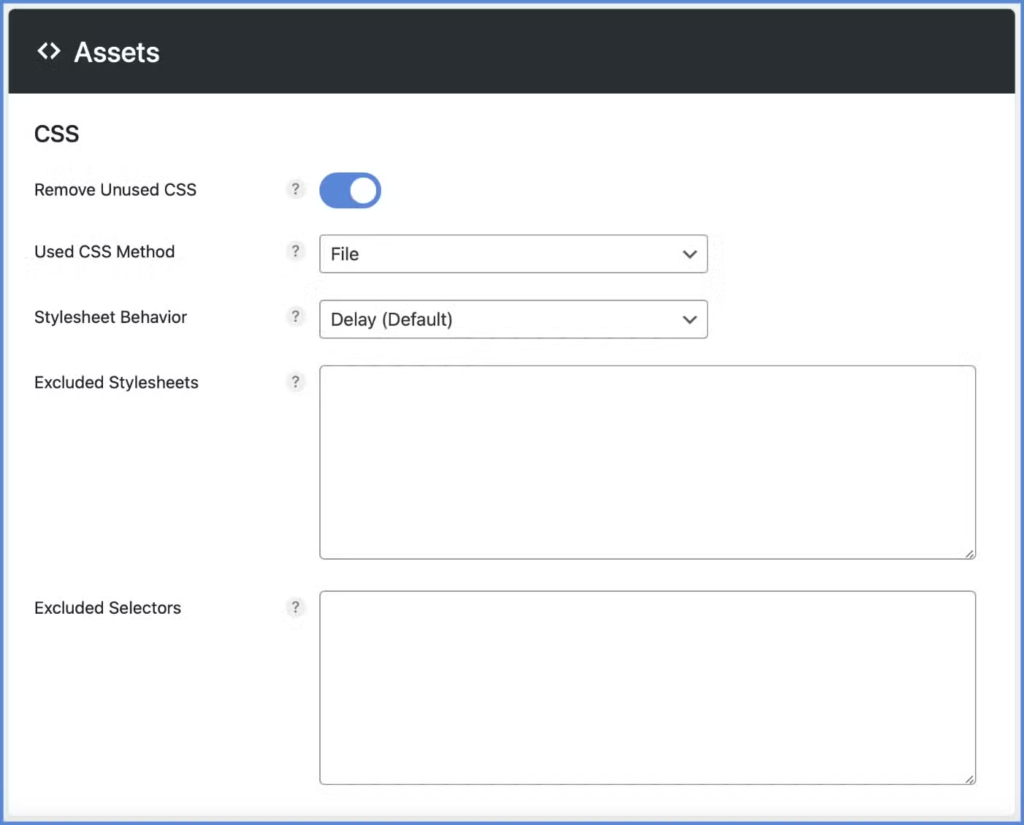
CSS Optimization
Critical CSS extracts styles needed for above-the-fold content and inlines them. The rest loads without blocking rendering.
- WP Rocket: File Optimization → CSS Files → “Optimize CSS delivery” (generates critical CSS automatically)
- FlyingPress: CSS → “Generate Critical CSS”
- Perfmatters: CSS → “Remove Unused CSS” (generates used CSS per page)
- LiteSpeed Cache: Page Optimization → CSS Settings → “Generate Critical CSS”
Remove Unused CSS goes even further. Instead of just prioritizing above-the-fold CSS, it analyzes each page and creates a minimal stylesheet containing only the CSS actually used. This can reduce CSS payload by 70-90% on pages that load bloated theme stylesheets.
CDN Setup: Serving Content Faster Globally
A CDN (Content Delivery Network) caches your content across global edge servers. Visitors download assets from the nearest location instead of your origin server.
Cloudflare: The Best Free Option
Cloudflare’s free tier provides:
- Global CDN with 300+ edge locations
- Free SSL certificate
- DDoS protection
- Basic optimizations (minification, Brotli compression)
Cloudflare APO ($5/month) caches entire WordPress pages at the edge, not just static assets. This is the single best performance upgrade for sites with geographically distributed audiences.
Recommended Cloudflare Settings
Speed → Optimization:
- Auto Minify: Enable for CSS, JS, HTML (or disable if your caching plugin handles this)
- Brotli: Enable
- Early Hints: Enable
- Rocket Loader: Disable (conflicts with most caching plugins)
Caching:
- Caching Level: Standard
- Browser Cache TTL: Respect Existing Headers
- Tiered Cache: Enable
Network:
- HTTP/3: Enable
Alternative CDNs
BunnyCDN (starts at $0.01/GB) offers excellent value with 119+ PoPs. Use with the BunnyCDN plugin or CDN Enabler for easy WordPress integration.
KeyCDN ($0.04/GB minimum) provides real-time analytics and simple setup.
If you’re already using WP Rocket, it includes RocketCDN ($8.99/month) which is powered by StackPath and integrates seamlessly.
Server-Side Optimizations
Some optimizations happen at the server level, outside of WordPress.
PHP Version
PHP 8.2 or 8.3 offers 30%+ performance improvement over PHP 7.4. Check your version in Dashboard → Tools → Site Health → Info → Server.
Upgrading is free performance. Most hosts let you change PHP version in your hosting control panel. Just verify your plugins are compatible first (they almost certainly are by now).
GZIP and Brotli Compression
Compression reduces text-based file sizes by 70-90%.
Good news: Your caching plugin probably handles this.
WP Rocket enables GZIP automatically. LiteSpeed Cache on LiteSpeed servers handles it. Most managed WordPress hosts enable compression at the server level.
To verify compression is working, run your site through GTmetrix. If GZIP/Brotli is enabled, you’ll see it in the Waterfall under Content-Encoding headers.
If compression isn’t enabled, add this to .htaccess:
apache
<IfModule mod_deflate.c>
    AddOutputFilterByType DEFLATE text/html text/plain text/xml
    AddOutputFilterByType DEFLATE text/css text/javascript
    AddOutputFilterByType DEFLATE application/javascript application/json
    AddOutputFilterByType DEFLATE image/svg+xml
</IfModule>
Brotli provides 20% better compression than GZIP. Cloudflare enables Brotli for free. Otherwise, it requires server-level configuration.
PHP Memory Limits
If you’re seeing white screens or timeout errors on complex pages, you might need more memory. Add to wp-config.php:
php
define('WP_MEMORY_LIMIT', '256M');
define('WP_MAX_MEMORY_LIMIT', '512M');
Core Web Vitals: The Metrics Google Cares About
Core Web Vitals are Google’s user experience metrics that directly impact search rankings:
- LCP (Largest Contentful Paint): How quickly the main content loads. Target: ≤2.5 seconds
- CLS (Cumulative Layout Shift): How much the page layout moves during loading. Target: ≤0.1
- INP (Interaction to Next Paint): How quickly the page responds to user input. Target: ≤200ms

Optimizing LCP
LCP measures when the largest visible element finishes loading. Usually this is your hero image, a video thumbnail, or a large text block.
Your optimization plugin can handle LCP automatically:
WP Rocket: Enable “Preload critical images” in the Media tab. WP Rocket automatically detects and preloads the LCP image.
FlyingPress: Has automatic LCP detection built-in. No configuration needed.
Perfmatters: Add your hero image URL to the “Preload” field, or use their Critical Images feature.
If PageSpeed still complains about LCP, check:
- Is your hero image too large? Compress it.
- Is your hero image lazy loaded? Exclude it (covered in the lazy loading section).
- Is your server slow? No plugin fixes slow hosting.
Fixing CLS
CLS measures unexpected layout shifts. Elements moving around as the page loads frustrates users.
Always specify image dimensions:
html
<img src="photo.jpg" width="800" height="600" alt="Description">WordPress handles this automatically for Media Library images since version 5.5.
Reserve space for dynamic content:
css
/* Ad containers */
.ad-slot {
    min-height: 250px;
}

/* Embeds */
.video-container {
    aspect-ratio: 16 / 9;
}
Font loading causes CLS. If text visibly reflows when custom fonts load, you have a font-related layout shift. See the Font Optimization section.
Improving INP
INP measures how quickly your page responds to user interactions throughout the entire page lifecycle.
Enable “Delay JavaScript” in your caching plugin. This prevents non-essential scripts from blocking the main thread until user interaction.
WP Rocket: “Delay JavaScript execution” in File Optimization
FlyingPress: “Delay JavaScript”
Flying Scripts (free standalone plugin): Delays scripts until user interaction
Large DOM size also hurts INP. If your page has thousands of HTML elements (common with page builders), interactions will feel sluggish. Simplify your layouts where possible.
Font Optimization
Web fonts can significantly impact performance and visual stability. The goal is loading them efficiently without causing layout shifts.
Self-Host Google Fonts
Using Google Fonts directly means extra DNS lookups and potential GDPR compliance issues.
Plugins that self-host automatically:
- OMGF (free) – Scans your site, downloads Google Fonts, and hosts them locally. Set it and forget it.
- WP Rocket – Media tab → “Host Google Fonts locally” toggle. One click.
- Perfmatters – Assets → “Local Google Fonts” toggle.
- LiteSpeed Cache – Page Optimization → Tuning → “Google Fonts Async”
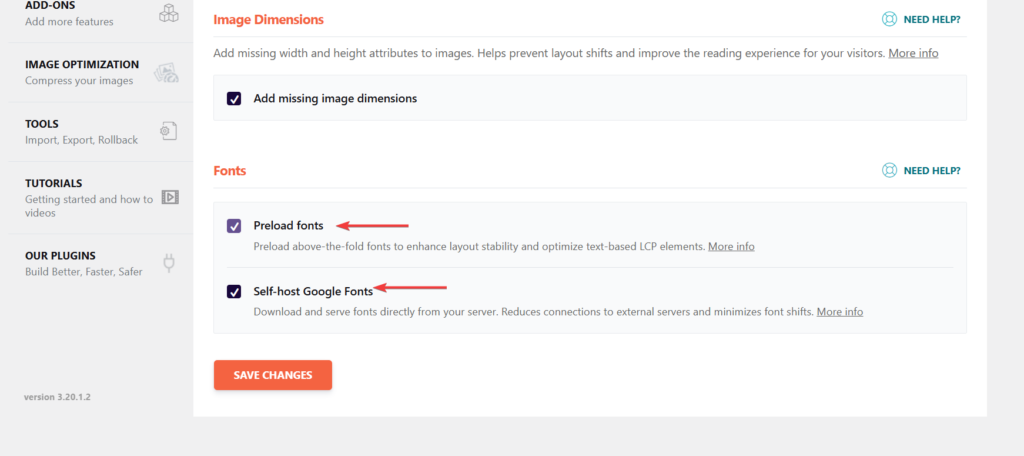
Preload Critical Fonts
Preloading tells browsers to download fonts early, before CSS parsing discovers them.
Your optimization plugin likely handles this:
- WP Rocket: Automatically preloads fonts used above the fold when you enable “Optimize CSS delivery.”
- Perfmatters: Add font URLs to the Preload field.
- FlyingPress: Automatic font preloading when critical CSS is enabled.
Preload manually only if your plugin doesn’t handle it. Add one or two critical font files (not all of them):
html
<link rel="preload" href="/fonts/inter.woff2" as="font" type="font/woff2" crossorigin>Reduce Font Files
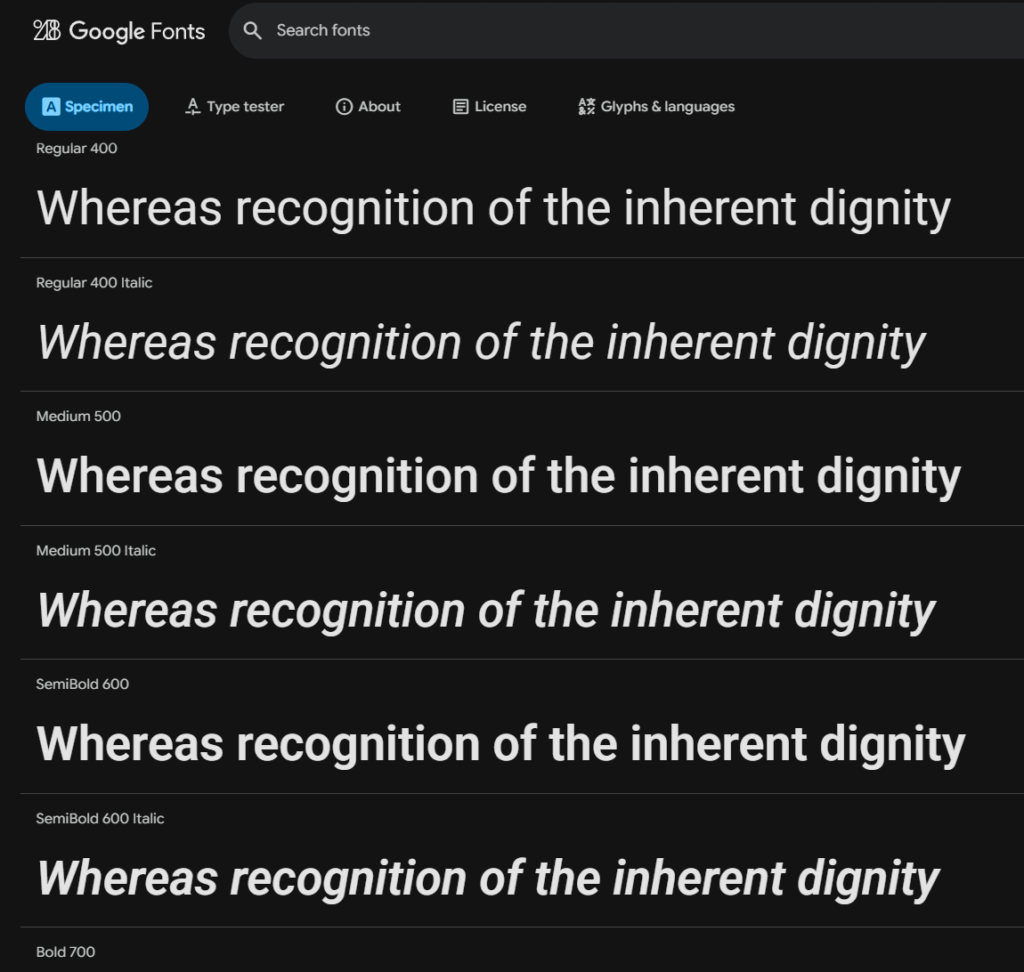
Each font weight and style is a separate file. Ask yourself: do you actually use Regular, Medium, Semi-bold, Bold, AND Italic?
Most sites can get by with 2-3 font files (Regular, Bold, maybe Italic). Remove the others in your theme or font loading settings.
Variable fonts combine all weights into a single file. Google Fonts serves variable fonts by default when available. One file instead of five.
Font Display Settings
Use font-display: swap to show fallback text immediately while custom fonts load (prevents invisible text).
Use font-display: optional for best CLS scores. The browser has a very short window to use the custom font; if it doesn’t load in time, the fallback stays permanently. No layout shift.
Most font plugins let you choose this setting. OMGF has a font-display dropdown. Perfmatters lets you set it per font.
Recommended Plugin Stack
Here’s what a well-optimized WordPress site typically runs:
If Budget Allows: WP Rocket + ShortPixel
WP Rocket ($59/year) handles 80% of speed optimization in one plugin:
- Page caching
- Browser caching
- GZIP compression
- JavaScript defer/delay
- CSS optimization and critical CSS
- Lazy loading with LCP protection
- Database cleanup
- Preloading and prefetching
- Local Google Fonts
For most sites, WP Rocket alone is enough. You don’t need Perfmatters on top of it unless you want the Script Manager for granular control.
ShortPixel ($4.99/month) or Imagify ($4.99/month) for image optimization. WP Rocket doesn’t include this.
Budget Option: Free Plugins
You can achieve similar results with free plugins, just more setup:
- LiteSpeed Cache or WP Super Cache (caching)
- EWWW Image Optimizer (image optimization)
- Asset CleanUp (script management)
- OMGF (local Google Fonts)
- Flying Pages (prefetching)
- WP-Optimize (database cleanup)
More plugins to manage, but zero cost.
For Debugging
Query Monitor (free) – Install temporarily to diagnose issues. Remove after.
Common Mistakes to Avoid
Running multiple caching plugins – They conflict. Pick one and configure it properly.
Over-optimizing – Spending hours shaving 50ms when you haven’t fixed the basics. High-impact changes first.
Ignoring mobile – Desktop scores don’t matter if 60% of your traffic is mobile.
Not testing after changes – Every optimization can potentially break something. Test thoroughly.
Using “optimization” plugins that add bloat – Some plugins marketed for speed actually slow sites down. Measure before and after.
Obsessing over perfect scores – 95 vs 100 rarely matters to users. Focus on actual load time and user experience.
Not checking hosting first – No plugin fixes fundamentally slow servers. Benchmark your hosting before spending hours on optimization.